Showing posts with label Crafts. Show all posts

11.02.2010

Baby Andy's Bachelor Pad is Decorated

In our last blog, I talked about striping Baby Andy’s room to look like wallcovering. It is so great to do this, since if you don’t like it or want to change it, it is an inexpensive paint job to fix. Of course, we all loved our results. Now it was time to finish the job.

Remember we are using the Owls Sky pattern from Dwell Studio. It is
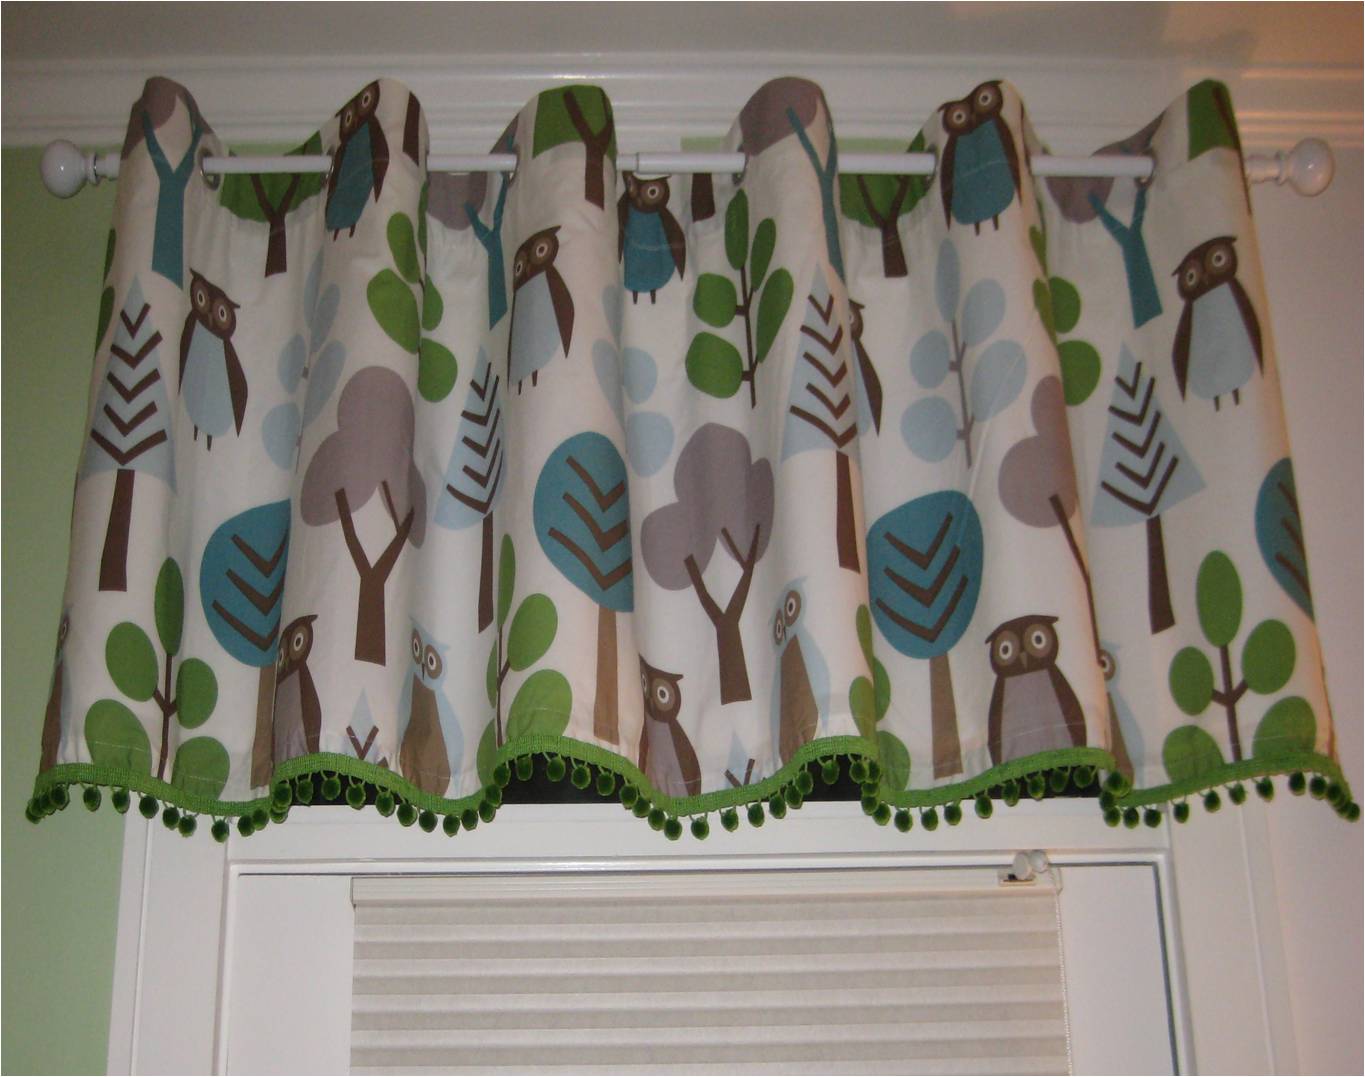
a charming owl and tree print fabric in a soft mercerized cotton. The colors are so perfect – turquoise, green, brown and gray on a white background. When Adrienne ordered the crib ensemble, we found we could order a lot of different pieces (pretty much any baby thing imaginable) but we could not order fabric by the yard. We needed this so I could make a window treatment.

So, we improvised. Adrienne ordered the matching shower curtain - a nice 6’x6’ piece of beautiful patterned fabric in a smaller scale than the crib quilt. Perfect for a window treatment. The shower curtain
had a nice top treatment with grommets, and instead of cutting them off and making a casing, I kept the buttonholes and cut from the bottom, the measurement I needed plus yardage for a 2 ½” hem. I then lined the fabric, very simply with a plain white good quality lining – lining is essential, as it keeps the “body” of the fabric in place, doesn’t stretch and protects the main fabric from sun damage. I simply cut a piece of lining and neatly attached it. I then added a cute green ball fringe to dress it up and we were ready to go.

The baby’s room window measured about 3” across (it is a transom area above a door), so the 6” width was perfect. You usually want to double your measurements to get a nice fluffy treatment. I purchased an inexpensive white rod with a ball finial at K-Mart from the Martha Stewart line and hung it up. It is adorable.

I used some of the remaining bits of fabric to cover a night light shade I bought at Hobby Lobby for about $8. I have seen it online for ½ the price. I added the ball fringe to this also and it was ready.

I found a wonderful chocolate brown rug at HomeGoods in a 4'x6’ size and we placed it in the middle of the room. The deeper color was essential as little Andy’s room leads out onto a wonderful deck. I figured it was a high traffic area and a sweet pastel rug was not such a good idea. It has a circle pattern in turquoise, grey and white.

Of course there was some remaining fabric, so I found a wonderful laundry basket with handles at Tuesday Morning. It had a striped lining, so I removed the lining, took it apart and used it as a pattern. I cut out pieces from our pretty owl fabric, sewed them together and made a new lining for the basket. Instead of heavy fabric ties, I used a lime green ribbon to thread threw the casing. It now houses baby wipes and diapers in Andy’s room.
Adrienne and Jim purchased classical white furnishings – crib, dresser (doubles as a changing table) and bookcase. The final touches were very personal – photos of the grandparents (that’s me) and original whimsical pieces that hung in Jimmy’s room when he was a baby that his mom had saved. Adie added some classic toys of Jimmy’s (like the talking phone every child owned) and Archie and Jughead that lived in her room when she was young.


I am not sure what kind of entertaining Baby Andy will be doing in his Bachelor Pad, but he will be doing it in style, I am sure of that. His daddy bought him a shirt that said “Lock Up Your Daughters” and I hope they heed the warning!

8.27.2010

Great Do-it-Yourself Websites

My great Mom, who you are all familiar with, accidentally sent herself two subscriptions to Ladies Home Journal magazine. When she called and tried to cancel one, they refused, so she had them send one to me instead. I haven’t read this magazine in years and imagine my surprise when I found some very good articles on design and a few great websites I checked out for you.

In this month’s issue, (September) on pages 76 and 78 there are great design ideas. On page 76, they feature wonderful urethane moulding. Now crown moulding, chair rails etc. always had to be cut and installed professionally because of the corner mitering issues, but now you can order pre-moulded pieces that can be painted and installed easily with adhesive and nails from
Fypon. The website is amazing – if you click on the e-catalog from their home page you will see a bunch of different moulded millwork products. They also have a ton of other ideas, how-to instructions and fun looks.


Next, check out DIY Upholstery Supply. Ladies Home Journal shows an ottoman with nailhead trim which is impossible to install, but this site sells nailhead trim in nickel and brass in a strip where you only have to nail every fifth tack. YES!! A great way to customize a store-bought thing and make it special. They also sell furniture legs and frames. Lastly, and I loved this one too, check out Hollywood Lights. You can purchase lampshades in assorted sizes that are SELF-ADHESIVE and you can easily cover them yourself. They even show a self-adhesive nightlight for $4.79 that I recently purchased at Hobby Lobby for $8 two weeks ago and covered for Adrienne’s baby’s room. You will be seeing a photo of that soon in a new nursery blog. Anyway, take a moment to check out these sites - they are grand!!

2.24.2010

Honoring a Dad and a Hero

Jen M. from Boston (a favorite blog reader with great comments and questions) recently wrote to me regarding a piece of special memorabilia she received from her dad.

Jen inherited her dad’s Army duffel bag. It has so much sentimental value for her family and she wanted some creative ideas on how to use it in a practical manner and perhaps share it with her 3 brothers. Jen sent me a few photos which you can see below. If any of you have any good ideas on how to best use the bag please let us hear from you.


Here are my suggestions:

I think the best idea (especially to share the bag) is to purchase shadow boxes and make 4 (Jen and 3 brothers) framed pieces they can each hang in their homes. Using the heavy green canvas for the background, Jen can customize each one. Use the straps to create a border (or just a top and bottom border) or use patriotic ribbon for a colorful accent. The buttons on the bag along with a photo of dad with each child can be added in the box or a photo of dad in uniform. The identification tag can be cut and used prominently. Add a USA patch or a medal or military patch of dad’s and perhaps an engraved plaque at the bottom with dad’s name and rank.

A good framer can do all this and more, but it can get pricey. I am thinking Jen can do this herself for a lot less money if she purchases the shadow boxes at Michaels (use your coupon, Jen) and cuts and irons the fabric perfectly before gluing it in place as the backdrop. Each frame can be individually decorated with dog tags and other sentimental items. The shadow boxes do not all have to be the same size and need not be identical when completed. The shadow boxes come in white, black and a deep mahogany stain – some are very plain while others have a beaded edge.

Camouflage fabric is also available if there isn’t enough of the canvas duffel bag fabric.


A second idea is to purchase a small ottoman (see photo) that has a removable lid and cover the lid with the fabric from the bag. I don’t think there is enough fabric to cover an entire footstool, although you could supplement with camouflage. A good upholsterer can use the straps to “trim” the top and it can also provide a bit of storage.


A couple of small pillows can also be made from the fabric if it is carefully cut. Again, use the straps for accents or “stripes” and miter the corners and sew on a USA patch or one of Dad’s patches in the bottom corner.

Jen, I hope these ideas will be useful and send you on a personal journey to utilize this wonderful keepsake. I am sure you and your brothers have many mementos that will honor your dad. I would love to know what you finally decide to do.

8.23.2009

My Beading Career

After much consideration (well...ok, not really) I have decided to resume my beading career. OK, I never actually HAD a beading career but I always knew I could’ve had one.

Here’s how I got into beading. About 8 years ago my Baseball Mom’s group (corny name but we have been friends for a very long time) spent an evening at a new bead shop sort of as a “field trip” before we went out for drinks and dinner. We all paid a fee and a patient instructor tried her best to teach us, amidst our laughter and mockery, to make a bracelet and earrings.

Boy, did we think we were creative. Some of us actually used TWO bead colors and different shapes. We all managed to produce something. I wore my earrings until they broke but I still have my bracelet. For my birthday that summer, my friend Sue surprised me with my own beading tools, tray and instruction booklet. I was 50 when this happened and I still haven’t produced a thing and believe me, 50 is SO in my past.

When Pudgie and Vicki visited recently we went to quite a few specialty stores and whenever I see the beaded jewelry I always know I could make it. I mean I’m creative, I’m smart, and I know color and design, right?

So, I pulled out my beading tools and went to Michael’s, the craft store. When did Martha Stewart explode in there? Where did all those beads come from? Every color, shape and size, and every style imaginable. And pricey, too. I saw photos of ideas, like beaded candles and pillows and fruit, Styrofoam shapes, ornaments, hair jewelry and even glassware. And the “findings” (the parts you need to put it all together) – so many, many choices. Did you know you could even make your own beads from polymer clay that you bake in a TOASTER OVEN? Sounds like Girl Scouts to me.

Well, I am starting with a simple necklace. When I get it finished and win an award for it (I have confidence), I will take a photo and show it to you. Keep reading, you can always say you knew me when.

*Becky Knows Everything: OK, all of you watch out – one year I learned to knit and everyone I know got a scarf for Christmas. This year – beaded bracelets for all!! (Or maybe a pair of flip flops for my really loyal readers).

6.16.2009

Bridal Place Card Holder

As wedding season is upon us, I wanted to share with you the essentials of making a card holder to beautifully display table numbers at your reception. I highly recommend assigned seating so all of your guests have a place to go when the doors open. I have been to a few weddings where the only people I knew were the groom’s parents and without assigned seating you just sort of wander until someone looks welcoming. (Not all that different than the lunch room in junior high).

While looking for table card holders for my daughter’s wedding last year, I scoured the internet and searched the bridal magazines and never found anything unusual or that I had not seen a zillion times before. Creatively speaking, I wanted something pretty and useful and memorable. Inspiration hit me in
T.J. Maxx of all places. I saw resin figures designed to be necklace holders in the home décor section. I am sure you have seen these. They are female figures, dressed in elaborate molded gowns in different colors and designs. I knew my designer’s imagination could use these figures as a starting point. I purchased 20 figures, one for each table, but figured I would start with one and see how it went.

First, I bent the 2 “arms” to the front, almost like clasped hands. Then I bent the 2 back spokes upward and the 2 front spokes down, forming a perfect spot for a card.

To begin the craft portion I sanded each figure with a fine grain sandpaper. The figures had been painted with an enamel paint – I knew another paint would not go on easily without first sanding the surface. Carefully, I removed all the dusty particles and began to paint the figures white. I used
Delta Brand Ceramcoat, which is a water soluble acrylic paint (all that means is that it can be easily cleaned and mistakes have a better chance of being fixed). Using a decent small brush, the paint applied easily, except for the fact that I am a terrible detail painter and some of these figures had molded dresses that had one skinny strap and pearls around their necks or halter tops. I once had to pay a ceramic instructor to paint the eyes on a Thanksgiving figure I had made since I goofed it up so many times. She charged me $1.00 per eye (like I would only have her paint one eye).

Anyway, you will have to paint each figure twice or even three times if the gowns are dark in tone. Use a tiny brush for detail or even a toothpick. When they are completely dry, the real fun begins!! You get to decorate them and make them look like brides. Using tacky glue (the brand I like best is Aleene’s), pour some glue in a small bowl and pour water in another bowl. “Paint” the figures with a glue/water mix and do one side at a time. As you complete a side, quickly spread on white sparkly glitter. This is messy, so shake or pour on the glitter over a shoe box or it will still be on your kitchen floor at Christmas.

When the glitter is all on all the figures, decorate them with teensy white silk flowers. I bought these very cheaply at craft and dollar stores. You need flowers with flat backs and they need to be small. Using hot glue, attach the flowers wherever you want. Sometimes I had to glue them over painting mistakes but I am sure that won’t happen to you.

I glued a cluster of flowers to one of the “hands” to form a bridal bouquet and glued narrow white satin ribbon (NOW, you finally have a place to use that skinny, skinny ribbon that is 3 spools for $1.00 you never knew what to do with).

Let’s make the veil. I use the term lightly since this is a headless figure. The veil is actually a train off the back of the figure. I gathered up white tulle and tied it tightly about an inch down from the top with a satin skinny ribbon to form a pouf and left long streamers. I glued flowers to the streamers and glued it all to the back of the figure, about waist high. The final touch was to add pearl sprays on the dresses wherever it needed any extra touches. These were the prettiest table card holders ever.

The photo below, provided courtesy of Broadway Photography and Video is the final result. The bridal ladies were so pretty on the reception tables. Also, I ordered my table cards from a great company, Documents and Designs. They had a huge assortment to choose from and they were very easy to work with.


*Becky Knows Everything: A note about numbering - do not make your bridal table #1 in the reception area. Usually the bridal table is in the center and if you begin numbering from the center of the room your guests will be confused. For your own entertainment, you can watch them scurry around, but it really isn’t very nice. Table #1 should be the closest table to the entry doors.

6.12.2009

Happy Birthday Mom

In our family, my sister Bonnie and I have a tradition concerning Mom’s birthday. For the past 20 plus years we each give her 6 small presents on her birthday so she has a gift to open each month all year. Now, like anything else, the gifts and their value go up and down with our finances, time constraints, etc. We try to take advantage of seasonal sales and we alternate months. Well, of course, after 20 some years Mom has a zillion holiday pins, dish towels and apparently (if you read the blog on a regular basis) a ton of knee highs.

We have had a lot of fun along the way. One year I gave her a pajama top for April and Bonnie gave her the bottoms in May – took Mom the entire month to get the joke. Another time for my 6 months I gave her 6 white tops since that is pretty much all she likes to wear. She never did catch on to that one! It is so cute – she piles the gifts on a chair in her bedroom and the first of each month she unwraps a gift. She even has her beautician (I’m pretty sure they aren’t called stylists in Lorain, OH) asking her what the gift was every month.

Anyway, this particular year I am on a tight budget so I decided to get creative and make her a gift! I went to
Michaels (that crazy, gigantic craft place) and I purchased a pair of hot pink flip flops for 99 cents! (I know what you are thinking – who gives an 84 year old woman a pair of flip flops, but Mom is steady on her feet). I also bought a small roll of polka dot grosgrain ribbon. I knew I had some other supplies from previous projects.

First, I hot glued a length of ribbon to each plastic strap. I glued an artificial flower (get small ones with flat backs) over the raw edge. I made small bows (7 for each foot) and glued one in the center and 3 spaced evenly on the side. Then, I added flowers and individual pearls for fun. Be sure to pull off the glue strands as you go since they accumulate quickly. Pretty soon the straps were totally covered and I was so excited I went back to Michaels and bought 3 more pair – for Bonnie and my daughter and me! I WAS IN A FLIP FLOP FRENZY!!