Showing posts with label Fabric. Show all posts

10.03.2011

The New Fall Catalogs

I have been exploring the new fall catalogs for you and I have found a couple you might enjoy. At this time of year the catalogs are so plentiful, as the holidays are approaching and they are all trying to entice us to buy.

If you try
Catalogs.com, you will find a wonderful resource of so many different catalogs. And you can pretty much order all of them for free. I have been getting catalogs for years – as a designer they were part of my everyday life and they seem to follow me no matter where I live. Just for fun and just for you, I scoped out a few new ones I wasn't that familiar with.

Image Design and Furniture Company was chock full of great home décor items. There are so many categories on the website for you to try, like florals, vases, accents, throws and home accents. Themed décor wasn’t great – too many roosters, jungle and rustic lodge stuff. I clicked on picture frames, decorative bottles and vases and I found a treasure trove of fun stuff. They also have a group of home décor gifts under $25 which is pretty great. The “Old World Italian” section has some cool home lighting and rugs. Give this one a try!

My next stop was a website called
Layla Grace. Wow, do they ever have cool furnishings. They have a gorgeous group of nursery furniture (not that same old Toys R Us stuff or even Pottery Barn). Check out their “Staff Favorites” which includs a pretty wedding book keepsake and some great candlesticks. I think this website is a keeper and I have already ordered my own catalog. They are showcasing beautiful Dwell Studio fabrics which can be ordered by the yard. While the prices aren’t exactly inexpensive, they do carry ordinary things with extraordinary designs, like oven mitts and tablecloths.


Try some updates in your home for fall. Broaden your horizons and instead of just shopping where you happen to live, check out a few new home décor websites and order yourself a catalog!! Happy Fall.

8.30.2011

Chairs, Chairs and More Chairs

Have you noticed all the cool side chairs out there lately? An article in our local paper caught my eye recently—they showed a photo of a chair covered in different fabrics with different wood finishes and it was amazing how the chair changed personalities.

I went scouting for chairs for you and there is a great selection. You can find stylish chairs with and without arms, chairs with high backs and low backs, ones that are really only decorative and others that are supremely comfortable.

There is a catalog out there you all should sign up to receive. It’s called
Ballard Designs and it is full of up-to-minute styling for all sorts of things. Their current catalog has a display of multiple chairs on the cover available in different fabrics and finishes. Some of them may seem a little pricey but they sure can give you a jumping off point to figure out something creative for yourself.

I went to my favorite discount stops like
Tuesday Morning and Marshalls and took some photos for inspiration. Haven’t you always wished you had one more great side chair you can pull away from the corner to seat that extra guest or use for a nice accent? I know all my clients always like this idea and here is your chance to make that happen!!

4.01.2011

That Parisian Look


You see it everywhere now, in rugs and lampshades and pillows and furniture. I am talking about the wonderful new look of linen with prints of Paris and French words written in both block and script.

These new/old items have become popular as accents anywhere in the home. Remember the rooster look of a few years ago? You could find rooster prints on dishtowels, tablecloths and napkins. And there were plates with roosters, cookie jars and giant accent roosters. So many of my design clients were into this look and it was difficult to convince some of them that we should stay away from the ordinary and look for the unusual. It is still out there but has diminished in popularity although there are still a lot of collectors out there still buying rooster.

At Tuesday Morning whenever we get in any merchandise with London or Paris prints they sell immediately. Last week we had a round ottoman with stained, turned legs that I quickly took a photo of for you as I knew it wouldn’t last. I was right – we sold it in 2 days. We currently have tea-stained linen pillows, some dishtowels and a few adorable small lamps with linen printed shades.

You can bring that little bit of Paris into your home without spending too much. Check out what is available online or in your local overstock stores! Au Revoir!

11.02.2010

Baby Andy's Bachelor Pad is Decorated

In our last blog, I talked about striping Baby Andy’s room to look like wallcovering. It is so great to do this, since if you don’t like it or want to change it, it is an inexpensive paint job to fix. Of course, we all loved our results. Now it was time to finish the job.

Remember we are using the Owls Sky pattern from Dwell Studio. It is
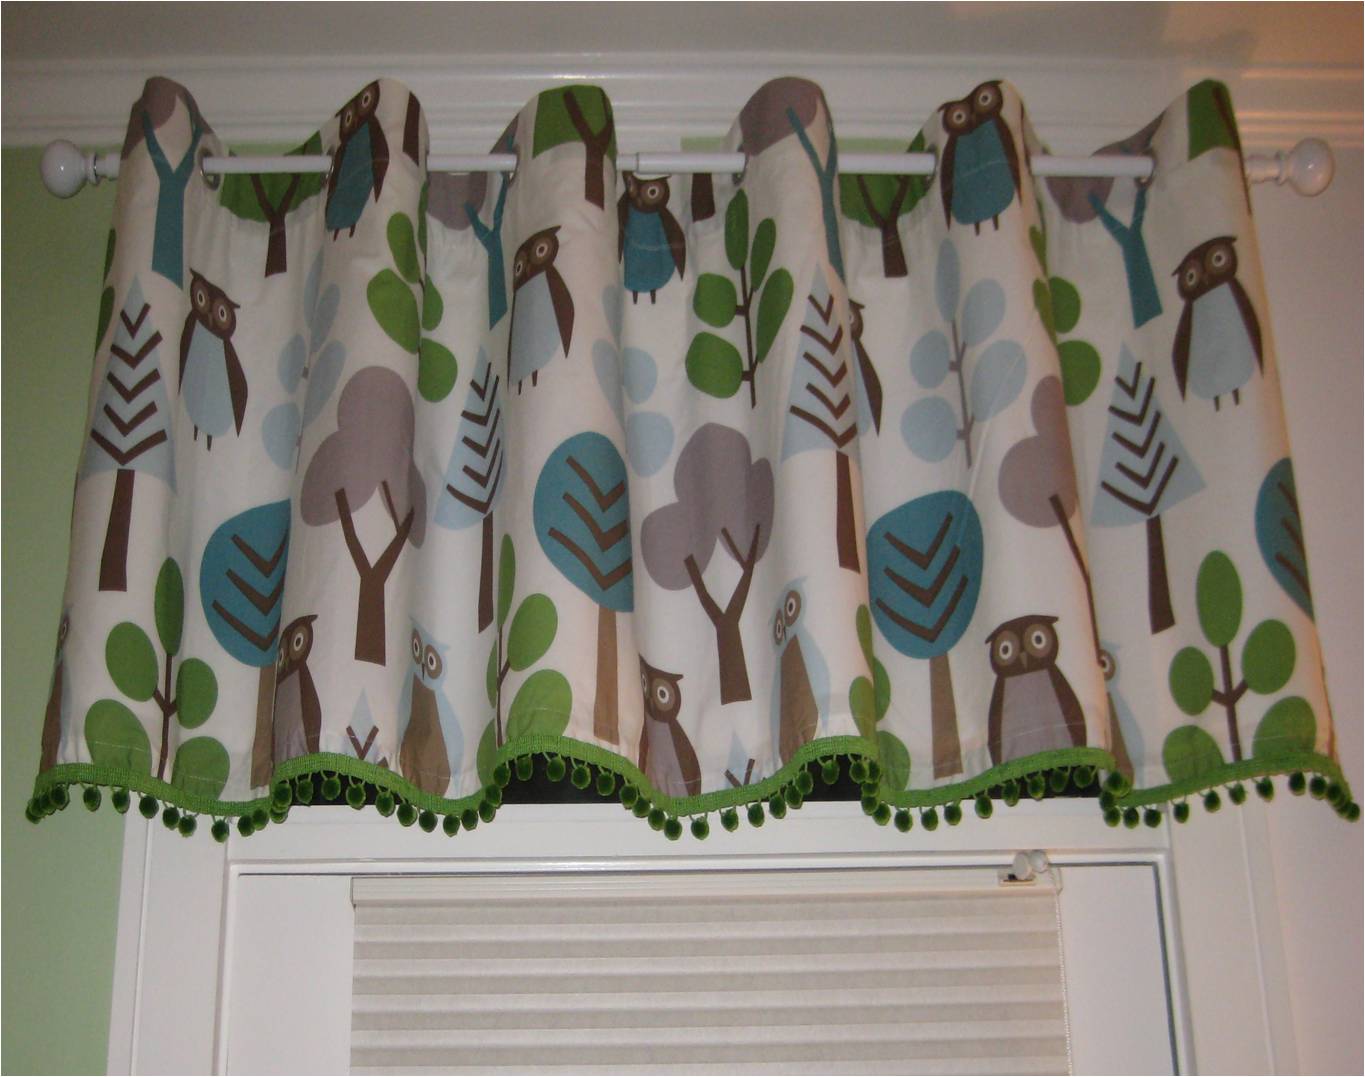
a charming owl and tree print fabric in a soft mercerized cotton. The colors are so perfect – turquoise, green, brown and gray on a white background. When Adrienne ordered the crib ensemble, we found we could order a lot of different pieces (pretty much any baby thing imaginable) but we could not order fabric by the yard. We needed this so I could make a window treatment.

So, we improvised. Adrienne ordered the matching shower curtain - a nice 6’x6’ piece of beautiful patterned fabric in a smaller scale than the crib quilt. Perfect for a window treatment. The shower curtain
had a nice top treatment with grommets, and instead of cutting them off and making a casing, I kept the buttonholes and cut from the bottom, the measurement I needed plus yardage for a 2 ½” hem. I then lined the fabric, very simply with a plain white good quality lining – lining is essential, as it keeps the “body” of the fabric in place, doesn’t stretch and protects the main fabric from sun damage. I simply cut a piece of lining and neatly attached it. I then added a cute green ball fringe to dress it up and we were ready to go.

The baby’s room window measured about 3” across (it is a transom area above a door), so the 6” width was perfect. You usually want to double your measurements to get a nice fluffy treatment. I purchased an inexpensive white rod with a ball finial at K-Mart from the Martha Stewart line and hung it up. It is adorable.


I used some of the remaining bits of fabric to cover a night light shade I bought at Hobby Lobby for about $8. I have seen it online for ½ the price. I added the ball fringe to this also and it was ready.

I found a wonderful chocolate brown rug at HomeGoods in a 4'x6’ size and we placed it in the middle of the room. The deeper color was essential as little Andy’s room leads out onto a wonderful deck. I figured it was a high traffic area and a sweet pastel rug was not such a good idea. It has a circle pattern in turquoise, grey and white.

Of course there was some remaining fabric, so I found a wonderful laundry basket with handles at Tuesday Morning. It had a striped lining, so I removed the lining, took it apart and used it as a pattern. I cut out pieces from our pretty owl fabric, sewed them together and made a new lining for the basket. Instead of heavy fabric ties, I used a lime green ribbon to thread threw the casing. It now houses baby wipes and diapers in Andy’s room.
Adrienne and Jim purchased classical white furnishings – crib, dresser (doubles as a changing table) and bookcase. The final touches were very personal – photos of the grandparents (that’s me) and original whimsical pieces that hung in Jimmy’s room when he was a baby that his mom had saved. Adie added some classic toys of Jimmy’s (like the talking phone every child owned) and Archie and Jughead that lived in her room when she was young.


I am not sure what kind of entertaining Baby Andy will be doing in his Bachelor Pad, but he will be doing it in style, I am sure of that. His daddy bought him a shirt that said “Lock Up Your Daughters” and I hope they heed the warning!

10.29.2010

Baby Andy's Bachelor Pad

In our latest blog I introduced you all to our newest family addition - Adrienne and Jim’s baby, Andrew Joseph, born Oct. 2. Before the arrival of little Andy, Adrienne and I worked together on preparing his new room.

Adrienne purchased the Owls Sky collection design from Dwell Studio, a company with interesting patterns, (not standard issue Babies “R” Us) with bea
utiful color combinations. Stephanie, Baby Jackson and I were visiting about 5 weeks before Andy was due so I could help with the baby’s room décor.

Their Boston apartment is done in greyed turquoise and deep lime greens with raspberry accents. Since it is a city space (which means smallish), she wanted to use a color for the baby’s room that worked with the rest of the place
– no jarring differences when you entered his room. But, we also wanted to make it very special. So, when Jimmy frowned on wallcovering I came up with the idea of painting it in stripes that would echo wallcovering.

When I was married in 1973, I wanted to make our first apartment very special too, so I striped the walls in the bathroom in a hot pink and white. This
was way before I knew about blue painter’s tape, so the results (I loved this room) were uneven and very circus-like. I also made the stripes too narrow in this tiny room so the optical effect was very present. Many a guest, who might have had a bit too much wine or beer came out of that bathroom looking glazed and dizzy.

Well, time has passed and now I truly do know how to stripe a room by hand even though I had not done it in so long. Here is the plan:

You will need your supplies – a good ruler (I think a yardstick in to
o difficult to work with), two rolls or more of ScotchBlue Painter's Tape in 1 ½ “ width, a pencil with a good, clean eraser, a ladder and then all of your regular painting supplies.

First, paint the entire room the color you want the alternating stripe to
be – in our case, white. Then, allow it to dry and leave it alone for a day or two. If you start taping too early, the original paint will peel. We chose Sherwin Williams' Baize Green for our alternating color.

Now, the difficult part is deciding on how wide you want the colorful stripes to be. You have so many choices – they can be the same width, or really any
size you prefer. I was originally thinking of making all the stripes about 8” – thank goodness my daughter-in-law was also visiting, as she reminded me how optic a narrow stripe could be. I happened to have a 15” ruler with me, so that is what I decided to go with.

I began by starting in the corner behind the door – of course our room was not going to be divided evenly at 15” so it was important to start in the least noticeable area. When you finish and have to adjust the stripe width, you can do it where no one will really look.

Begin by measuring out 15” widths down the wall, marking your way with little pencil marks. Do one line at a time, then tape that line. Do not try to get ah
ead and measure more than one line at a time as you will drive yourself nuts and make mistakes.

Here comes the tricky part. When you tape over the white, remember you have to put the tape on the inside line of the white, (which means it is the outside line of the green) so when you remove the tape all the stripes are even. I would constantly check myself to make sure the tape was in the right place, by putting small pencil arrows showing direction at the top each stripe. Always check yourself in a pro
ject like this so when you start painting all goes smoothly and you don’t find out midstream one stripe is the wrong width.

Tape the entire room before you start painting unless you have a partner. In my case, I had Stephanie with me (Adrienne was working). When I had about 2/3 of the taping done, Baby Jackson fell asleep so Steph started the painting behind me, which was a huge help. At the end, I did have to adjust the stripes - all you do is measure the distance remaining (remember I was behind a door) and divide it. I ended up with two stripes being 12”, hardly a noticeable problem.

We had great success!! Peeling off the tape is the most wonderful, satis
fying feeling. There were a few areas where the green paint crept under the tape, but those were so easy to fix with the white base paint. Baby Andy’s bachelor pad was ready for his furniture and all the rest! Check out the finished product in the photos below. In the next blog, I will tell you how I made an adorable window treatment and night light out of a shower curtain!!


2.24.2010

Honoring a Dad and a Hero

Jen M. from Boston (a favorite blog reader with great comments and questions) recently wrote to me regarding a piece of special memorabilia she received from her dad.

Jen inherited her dad’s Army duffel bag. It has so much sentimental value for her family and she wanted some creative ideas on how to use it in a practical manner and perhaps share it with her 3 brothers. Jen sent me a few photos which you can see below. If any of you have any good ideas on how to best use the bag please let us hear from you.


Here are my suggestions:

I think the best idea (especially to share the bag) is to purchase shadow boxes and make 4 (Jen and 3 brothers) framed pieces they can each hang in their homes. Using the heavy green canvas for the background, Jen can customize each one. Use the straps to create a border (or just a top and bottom border) or use patriotic ribbon for a colorful accent. The buttons on the bag along with a photo of dad with each child can be added in the box or a photo of dad in uniform. The identification tag can be cut and used prominently. Add a USA patch or a medal or military patch of dad’s and perhaps an engraved plaque at the bottom with dad’s name and rank.

A good framer can do all this and more, but it can get pricey. I am thinking Jen can do this herself for a lot less money if she purchases the shadow boxes at Michaels (use your coupon, Jen) and cuts and irons the fabric perfectly before gluing it in place as the backdrop. Each frame can be individually decorated with dog tags and other sentimental items. The shadow boxes do not all have to be the same size and need not be identical when completed. The shadow boxes come in white, black and a deep mahogany stain – some are very plain while others have a beaded edge.

Camouflage fabric is also available if there isn’t enough of the canvas duffel bag fabric.


A second idea is to purchase a small ottoman (see photo) that has a removable lid and cover the lid with the fabric from the bag. I don’t think there is enough fabric to cover an entire footstool, although you could supplement with camouflage. A good upholsterer can use the straps to “trim” the top and it can also provide a bit of storage.


A couple of small pillows can also be made from the fabric if it is carefully cut. Again, use the straps for accents or “stripes” and miter the corners and sew on a USA patch or one of Dad’s patches in the bottom corner.

Jen, I hope these ideas will be useful and send you on a personal journey to utilize this wonderful keepsake. I am sure you and your brothers have many mementos that will honor your dad. I would love to know what you finally decide to do.

8.31.2009

Let's Talk Toile


Toile de Jouy is a style of cotton chintz fabric with origins in France (think 18th-19th century). It is characterized with a color scheme of either red, blue or green scenic patterns on a cream background. There are other colors out there now, like black and brown or red/yellow combinations, but they are not the original toile colors.

Pictorial scenes of people, flowers or animals are featured. Toile is still so prominently used today in elegant and casual traditional design because the limited palette allows a designer to easily combine it with other patterns - large checks, plaids or ticking stripes in the same color/cream palette are the most common.

While the patterns can be very busy, the eye sees a simpler look because of the monochromatic color, not a bold vibrancy of too many patterns and colors. Toile de Jouy is utilized everywhere in today’s design, from fabrics for draperies, pillows, bedding, and upholstery to dinnerware, wall-coverings, lamps and shades, table linens and even accent pieces like clocks or frames.

Personally, I love toile – it makes me happy to see it and I often study the pattern to see the layers of interesting details. It is the epitome of French Country Style which opts for a harmonious blend of multiple patterns, rustic yet refined.

If your home is decorated in a traditional style or you want to add a French touch, try a toile. It will work with almost anything and perhaps jump-start your new décor direction.

Let Toile de Jouy bring you JOY today!

*Becky Knows Everything: There are even toile fabrics found in clothing –try to resist, unless it is a cute baby dress or an apron. We don’t really want to dress like our window treatments, do we?