11.16.2010

Mom's Social Whirl

I know I write about Mom a lot, but that is because she is such a funny character. I talk to Mom on the phone every other day and she ALWAYS has news for me. It is so true, since she is one of the busiest 85 year olds ever.

Here is her schedule for the last week:

Sunday - First Mom reads three Sunday papers (my sister calls her house the Library of Congress - there is so much reading material), then, off to the Moose Hall for a potluck to watch the Cleveland Browns play. Of course, since it is a potluck, she is expected to bring a dish to share. When I ask what she is bringing, she tells me she is tired of cooking and is bringing a bag of potato chips. She must be feeling old today since she is always the first in line to bring something home-baked and yummy. The Browns lose again of course.

Monday - A short, quick trip to the grocery to buy the latest “scandal sheets”, like the National Enquirer etc, and a few groceries. In the evening, she has a St. Mary’s Women’s Guild meeting. My best friend from high school keeps in touch with Mom and is her usual chauffeur. Debbie will chauffeur her mother and mine to the meeting and believe me, I am very grateful. Tonight is a guest speaker that talks about the history of Lorain and Mom pronounces it boring. She is however, very happy that she got two compliments on her pretty outfit.

Tuesday - Mom has lunch scheduled with 4 women she used to work with a gazillion years ago. The youngest is 76 and Mom is the oldest. They call themselves the “J and F Cuties”, since they worked for a clothing company as seamstresses called Joseph and Feiss. They each take turn picking the restaurant and today its Mom’s turn. She chooses Red Lobster, which amazes me since she hates the smell of seafood, but man, she loves their shrimp scampi and apparently the cheddar cheese biscuits are perfection. She and her cronies always ask for more biscuits and then fill their handbags with them!

In the evening she meets at the Orthodox Church she still belongs to and its sisterhood group. The sisterhood had about 50 members when I was a child, but now is down to about 10. They plan their bake sale set for Election Day at the church. Mom will cook for this one, her Burnt Butter cookies. At the meeting she learns of another death - always someone dying in mom’s life and she has a funeral pretty much every few weeks. Her comments on how the dead person looks in the coffin are truly hysterical. These old people really compare notes on how the undertaker did his job, like how their hair looked or if the makeup was too orange.

Wednesday - Mom has another lunch scheduled, this time with 4 of her HIGH SCHOOL girlfriends - since Mom graduated 67 years ago this is quite a feat. By the way, she is also on the reunion committee. They go to Perkins and Mom orders the crepes suzette with orange sauce that she calls “craps” suzette. After lunch she is off to the funeral home for the “viewing” wearing what she calls her “funeral jumper.”

Thursday brings two events - first, its Bingo Thursday at the Moose and Mom is a regular. She wins a few bucks and that makes her happy. Then it’s back to St. Mary’s for the senior luncheon, an incredible value - for only $2 she gets lunch, (of course she won’t eat any of it because the food is so bad she says) and a program for seniors - like how to manage their wills, or Irish dancing or how to make a wreath. She says they talk to the seniors like they are not quite bright 5 year olds and she hates the crafts!

Friday brings another fish day - apparently there is something about fish that does attract her. It’s off to the local Slovak Home for a perch fish fry, fries and coleslaw. This is a place that serves on paper plates and still gives you a coke in a small bottle like they did years ago. But, before fish, she goes and has her hair done with a standing Friday appointment - $6 and she is washed, curled and dried and with that $1 tip that hairstylist can surely retire soon.

Saturday is her relaxing day - she goes to 4:30 Mass, then makes herself a little dinner and then watches old Lawrence Welk reruns from 1955. Don’t any of you be calling her between 7 and 8 on Saturday night, since she will not answer her phone.

Mom is so busy, driving herself around, visiting friends in nursing homes and going to funerals, it is amazing. She recently sent me a pretty photo of herself taken wearing a cute pink suit with a note that I should use it as her obituary photo. Let’s all hope that is a long time coming. In just a few weeks Mom will meet her first two great-grandsons when we all gather in Cincinnati for Thanksgiving. I hope you are fortunate to have a Mom as wonderful as mine!

11.12.2010

Vintage in Today's Decorating

I have noticed the home “vintage” look is popping up everywhere, in both fine accessory shops and places like HomeGoods and Tuesday Morning. I’m talking that look Anthropologie has perfected. You see it in dishcloths, frames, lamps, mirrors and especially in china and dinnerware.

I recently received a book titled “Vintage Vavoom” (2007 Action Pursuit Group) and it chronicles the vintage look in a wonderful pictorial manner. Blending vintage style with contemporary or traditional style is so easy – it makes for an eclectic look mixing modern and funky, nostalgia and functional.

Many of us have china or dinnerware we inherited from our families – in my case “borrowed forever” and this seems to be the crux of the look. Plates are displayed in wrought iron plate hangers, both horizontally and vertically (check out Hobby Lobby for some cool ones) and walls are decorated with mirrors or empty frames. Martha Stewart has made this look so affordable – all that whiteware she shows in white cabinets, with pretty lace accents. Even her linens have a reproductive look. I love the effortless style of blending colorful toile with decorative platters that are new but look old – this is where Anthropologie comes in big.

At Tuesday Morning there are reproduction cereal mugs and plates featuring the old Kellogg ads, many dish towels that look exactly like the ones in Mom’s drawer and great glass jars that can be used for display or practical purposes – flour, spices, etc. Jadeite glass collectibles or that cute white milk glass are making such a comeback, and when displayed properly look so great. And, they are actually useful, unlike the silk pillow your dog or new baby drooled on last week. I love it when people have a collection of dinnerware (the Royal Doulton Blue Willow china comes to mind) displayed in a white cupboard with the back of the cupboard painted a contrasting color to make the china standout.

Where are those old cookie cutters from your Grandma? They can be hung on your kitchen wall next to one of her old aprons (or buy a new pretty one at HomeGoods). Get those old books from Grandma’s attic and stack them on a table, then put a traditional lamp on top – everything evokes a memory that will make you smile.

I have found a lot of vintage decorating is right at your fingertips – just get out all the decorative stuff you have and think about how you can display everything. It will give you a good feeling – both remembering where it came from and if it wasn’t from family, which great flea market you got your “find.”

11.07.2010

I Love Pumpkin

I know pumpkin is so traditional a this time of year, and there are a few people out there who don’t care for it (Sue, are you kidding me?) but each year in the fall, I make a pumpkin dessert that isn’t pie just to try something new. Last year I made a pumpkin praline torte for company and it was so fabulous, I made it again last week.

We had the Raynor’s for a college game night recently and I made this for dessert. It came from a Sunset magazine, Nov. 2005.


Ingredients:

3/4 c. firmly packed brown sugar
1/3 c. butter
4 ¾ tbs. whipping cream
1 c. chopped pecans
4 large eggs
1 2/3 c. sugar
1 c. vegetable oil
2 c. pumpkin from a can
1 tsp. vanilla
2 c. flour
2 tsp. baking powder
2 tsp. pumpkin pie spice
1 tsp. baking soda
1 tsp. salt
1/4 c. powdered sugar.

Preheat oven to 350 degrees. Butter two 9” cake pans and line bottoms with parchment paper. This step is very important or you will not be able to get the cake out of the pan.

In a heavy pan over low heat, stir brown sugar, butter and 3 tbs. of the whipping cream until sugar melted and blended about 5 minutes. Pour half the brown sugar mixture into each pan and sprinkle 3/4 c. pecans evenly into each pan.

In a bowl, beat eggs, sugar and oil until well blended. Stir in pumpkin and 1/2 tsp. vanilla. In separate bowl, whisk together flour, baking powder, pumpkin pie spice, baking soda and salt. Whisk dry ingredients into pumpkin mixture. Pour half the batter into each pan.

Bake until a toothpick inserted in center comes out clean, 30-35 minutes. Let cool in pans on rack for 5 minutes, then invert. Cool about 1 ½ hours.

Up to 5 hours before serving, beat remaining whipping cream on high speed until soft peaks form. On low, beat in powdered sugar and 1/2 tsp. vanilla. Set one cake layer, praline side up on a dessert plate. Spread two-thirds of whipping cream on top, then top with other layer, praline side up. Cover with remaining cream and top with 1/4 c. pecans.

This is not only sensational looking but makes a delicious, fabulous cake that will serve 12. Store in refrigerator!!

11.02.2010

Baby Andy's Bachelor Pad is Decorated

In our last blog, I talked about striping Baby Andy’s room to look like wallcovering. It is so great to do this, since if you don’t like it or want to change it, it is an inexpensive paint job to fix. Of course, we all loved our results. Now it was time to finish the job.

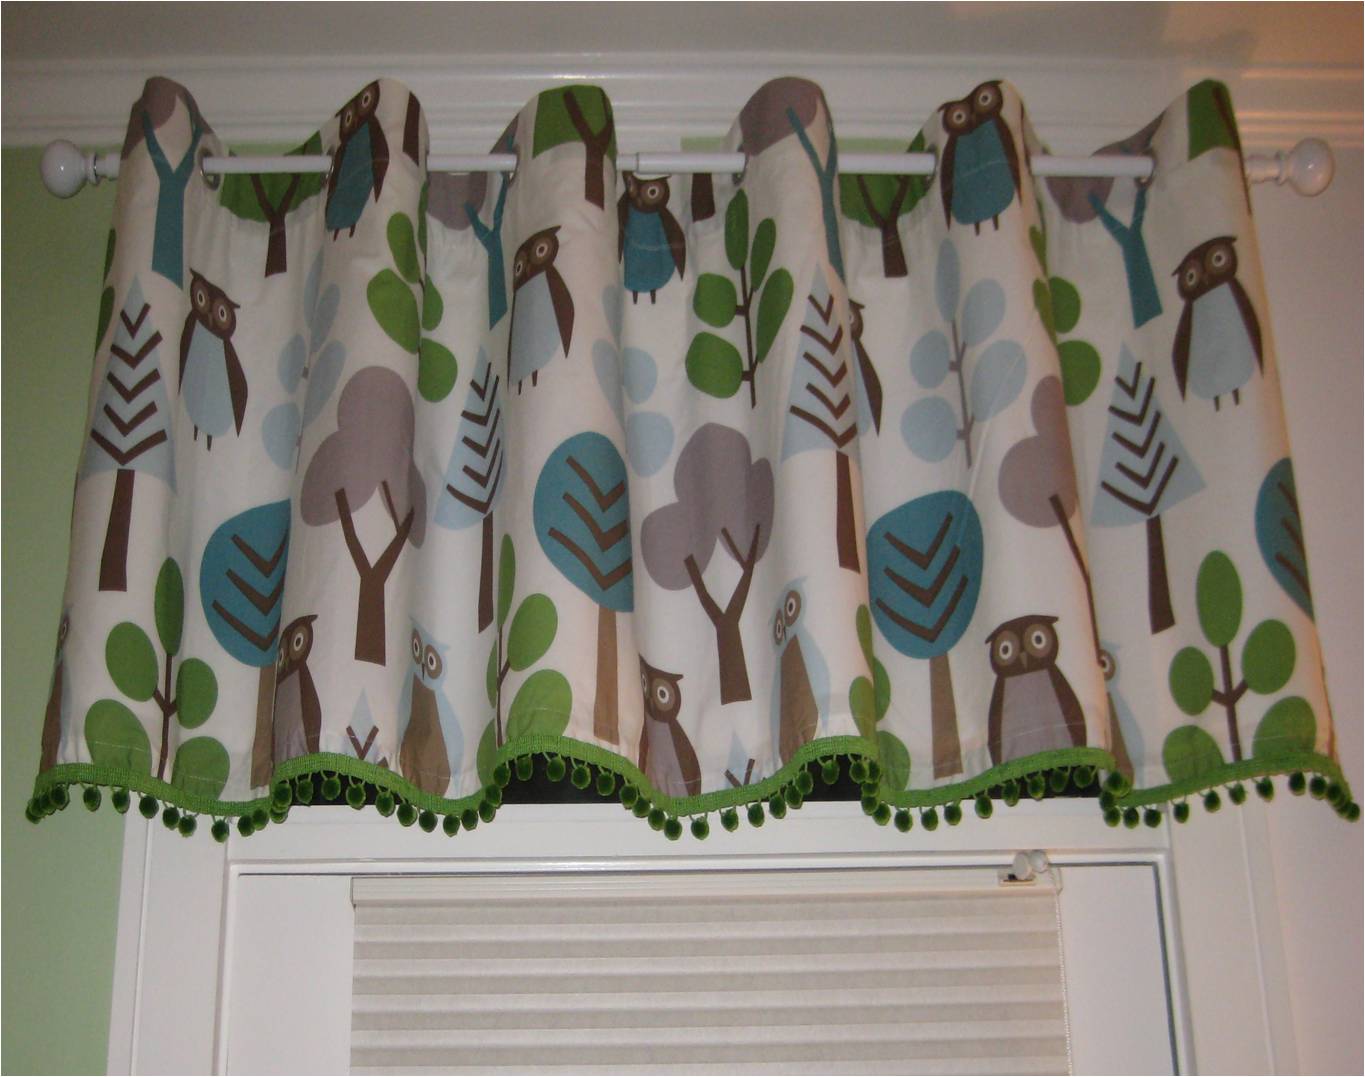
Remember we are using the Owls Sky pattern from Dwell Studio. It is
a charming owl and tree print fabric in a soft mercerized cotton. The colors are so perfect – turquoise, green, brown and gray on a white background. When Adrienne ordered the crib ensemble, we found we could order a lot of different pieces (pretty much any baby thing imaginable) but we could not order fabric by the yard. We needed this so I could make a window treatment.

So, we improvised. Adrienne ordered the matching shower curtain - a nice 6’x6’ piece of beautiful patterned fabric in a smaller scale than the crib quilt. Perfect for a window treatment. The shower curtain
had a nice top treatment with grommets, and instead of cutting them off and making a casing, I kept the buttonholes and cut from the bottom, the measurement I needed plus yardage for a 2 ½” hem. I then lined the fabric, very simply with a plain white good quality lining – lining is essential, as it keeps the “body” of the fabric in place, doesn’t stretch and protects the main fabric from sun damage. I simply cut a piece of lining and neatly attached it. I then added a cute green ball fringe to dress it up and we were ready to go.

The baby’s room window measured about 3” across (it is a transom area above a door), so the 6” width was perfect. You usually want to double your measurements to get a nice fluffy treatment. I purchased an inexpensive white rod with a ball finial at K-Mart from the Martha Stewart line and hung it up. It is adorable.


I used some of the remaining bits of fabric to cover a night light shade I bought at Hobby Lobby for about $8. I have seen it online for ½ the price. I added the ball fringe to this also and it was ready.

I found a wonderful chocolate brown rug at HomeGoods in a 4'x6’ size and we placed it in the middle of the room. The deeper color was essential as little Andy’s room leads out onto a wonderful deck. I figured it was a high traffic area and a sweet pastel rug was not such a good idea. It has a circle pattern in turquoise, grey and white.

Of course there was some remaining fabric, so I found a wonderful laundry basket with handles at Tuesday Morning. It had a striped lining, so I removed the lining, took it apart and used it as a pattern. I cut out pieces from our pretty owl fabric, sewed them together and made a new lining for the basket. Instead of heavy fabric ties, I used a lime green ribbon to thread threw the casing. It now houses baby wipes and diapers in Andy’s room.
Adrienne and Jim purchased classical white furnishings – crib, dresser (doubles as a changing table) and bookcase. The final touches were very personal – photos of the grandparents (that’s me) and original whimsical pieces that hung in Jimmy’s room when he was a baby that his mom had saved. Adie added some classic toys of Jimmy’s (like the talking phone every child owned) and Archie and Jughead that lived in her room when she was young.


I am not sure what kind of entertaining Baby Andy will be doing in his Bachelor Pad, but he will be doing it in style, I am sure of that. His daddy bought him a shirt that said “Lock Up Your Daughters” and I hope they heed the warning!

10.29.2010

Baby Andy's Bachelor Pad

In our latest blog I introduced you all to our newest family addition - Adrienne and Jim’s baby, Andrew Joseph, born Oct. 2. Before the arrival of little Andy, Adrienne and I worked together on preparing his new room.

Adrienne purchased the Owls Sky collection design from Dwell Studio, a company with interesting patterns, (not standard issue Babies “R” Us) with bea
utiful color combinations. Stephanie, Baby Jackson and I were visiting about 5 weeks before Andy was due so I could help with the baby’s room décor.

Their Boston apartment is done in greyed turquoise and deep lime greens with raspberry accents. Since it is a city space (which means smallish), she wanted to use a color for the baby’s room that worked with the rest of the place
– no jarring differences when you entered his room. But, we also wanted to make it very special. So, when Jimmy frowned on wallcovering I came up with the idea of painting it in stripes that would echo wallcovering.

When I was married in 1973, I wanted to make our first apartment very special too, so I striped the walls in the bathroom in a hot pink and white. This
was way before I knew about blue painter’s tape, so the results (I loved this room) were uneven and very circus-like. I also made the stripes too narrow in this tiny room so the optical effect was very present. Many a guest, who might have had a bit too much wine or beer came out of that bathroom looking glazed and dizzy.

Well, time has passed and now I truly do know how to stripe a room by hand even though I had not done it in so long. Here is the plan:

You will need your supplies – a good ruler (I think a yardstick in to
o difficult to work with), two rolls or more of ScotchBlue Painter's Tape in 1 ½ “ width, a pencil with a good, clean eraser, a ladder and then all of your regular painting supplies.

First, paint the entire room the color you want the alternating stripe to
be – in our case, white. Then, allow it to dry and leave it alone for a day or two. If you start taping too early, the original paint will peel. We chose Sherwin Williams' Baize Green for our alternating color.

Now, the difficult part is deciding on how wide you want the colorful stripes to be. You have so many choices – they can be the same width, or really any
size you prefer. I was originally thinking of making all the stripes about 8” – thank goodness my daughter-in-law was also visiting, as she reminded me how optic a narrow stripe could be. I happened to have a 15” ruler with me, so that is what I decided to go with.

I began by starting in the corner behind the door – of course our room was not going to be divided evenly at 15” so it was important to start in the least noticeable area. When you finish and have to adjust the stripe width, you can do it where no one will really look.

Begin by measuring out 15” widths down the wall, marking your way with little pencil marks. Do one line at a time, then tape that line. Do not try to get ah
ead and measure more than one line at a time as you will drive yourself nuts and make mistakes.

Here comes the tricky part. When you tape over the white, remember you have to put the tape on the inside line of the white, (which means it is the outside line of the green) so when you remove the tape all the stripes are even. I would constantly check myself to make sure the tape was in the right place, by putting small pencil arrows showing direction at the top each stripe. Always check yourself in a pro
ject like this so when you start painting all goes smoothly and you don’t find out midstream one stripe is the wrong width.

Tape the entire room before you start painting unless you have a partner. In my case, I had Stephanie with me (Adrienne was working). When I had about 2/3 of the taping done, Baby Jackson fell asleep so Steph started the painting behind me, which was a huge help. At the end, I did have to adjust the stripes - all you do is measure the distance remaining (remember I was behind a door) and divide it. I ended up with two stripes being 12”, hardly a noticeable problem.

We had great success!! Peeling off the tape is the most wonderful, satis
fying feeling. There were a few areas where the green paint crept under the tape, but those were so easy to fix with the white base paint. Baby Andy’s bachelor pad was ready for his furniture and all the rest! Check out the finished product in the photos below. In the next blog, I will tell you how I made an adorable window treatment and night light out of a shower curtain!!


10.13.2010

Introducing Baby Andy

Our family has been very blessed this year with the births of two healthy grandsons. Our second grandson, Andrew Joseph was born on Oct. 2 to our daughter Adrienne and her husband, Jim.

Baby Andy was born a week past his due date and was a long time coming. He simply was enjoying himself too much right where he was and it took a lot of coaxing and time to get him to come out and meet his new world. But, eventually he did and he is beautiful and healthy and sweet.

I was fortunate to be in Boston to meet him immediately after his birth and to hold him at once. He weighed 8lbs. 3oz. and you definitely forget how tiny that is, even though that is a very good weight for a newborn. I visited with the new family for a week and it was magical, seeing him change a bit every day, being able to hold him anytime I wanted, and marveling at how great our daughter is doing both physically and mentally (she is SO much more together as a first-time mom than I ever was, that’s for sure).

Of course his days and nights are beginning to get scrambled – they fool you that first week since they sleep so much and I am sure Adrienne and Jimmy have a lot in store for them in the coming weeks but they can handle it!

Another thing I have noticed with my son and son-in-law – this generation of new fathers is miraculous. They are so interested in every aspect of baby care, are sad if they cannot spend enough time with the baby and are able to take time from work for paternity leave. When I had our two children, Mike was with me at the hospital and then brought me home and went back to work. In those days the moms’ had the responsibility of caring for the baby – well thank goodness NOT ANY MORE! These dads are amazing and loving and just so very, very proud to be part of it all.

Baby Andy is the luckiest little guy of all since he has two parents that love him and each other so much and is also living in a totally cool apartment in Boston with a park around the corner!! Can’t wait until Thanksgiving when we will all be back in Cincinnati and the new cousins, Jackson (born June 1) and little Andy will get to meet each other!

9.27.2010

Pumpkin Fun

I was recently reading an article in a small local newspaper (one of those you get free in your mailbox) and there was a funny (to me) piece on what to do with pumpkins. I figured I have had some experience with pumpkins and I would come up with my own list.


Pumpkin Problems and Possibilities

1. Never try to carve those tiny cute squash things to use as candle holders or place card holders for your table. A smallish pumpkin will work but those gourds and squash things need an electric saw to get through. I know this from experience and have the scar on my finger to prove it.

2. Don’t let anyone talk you into toasting fresh pumpkin seeds in the oven. First, you have to get through all nasty gook and then clean them and frankly you can buy them at the grocery for practically nothing.

3. Make yourself a pumpkin pie – surely the easiest pie to make in the world. I never have the urge to tinker with the recipe on the back of the Libby’s pumpkin can. It’s perfect as is.

4. If you have people coming over, make a pumpkin cheesecake. Very delicious and a lot of recipes available out there.

5. Make pumpkin soup – again from canned pumpkin. This time hollow out small real pumpkins or do what I did…buy cute pumpkin shaped bowls from a discount store.

6. Make yourself a nice buffet or foyer centerpiece using pumpkins in a couple of sizes, some gourds and corn and wheat. I really do love the fall colors and a centerpiece like this will last a long time in the house. The pumpkins don’t rot as they do outdoors if the sun gets them.

7. In the article, they said to make pumpkin butter. I tried this and it was awful, so don’t go there.

8. The article also suggested carving out an extra large pumpkin and posing your small child or pet inside and taking a photograph. WHAT? Stephanie, please do not place my first grandchild in a wet pumpkin for a photo – not that you would ever do that!

9. OK so other than baking, and there are a lot of great recipes for pumpkin desserts out there (mousse and cake and even bread), I cannot think of another good or bad idea. So, there is no number 10. Have a beautiful fall.